Ah, the learning experience from last time was very helpful in getting my rainbow of eggs done. This time I did it all in one day. And I cut my dyes down to four items. I still had some things I learned again. Like more is better when it comes to the amount of dyestuff you use. Well turmeric is pretty potent, but the rest give better colors when very saturated. I was a bit short on beets this year and really had to work to get my color to set well.
Update: Want to try this with brown eggs? It does work!
Update: Want to try this with brown eggs? It does work!
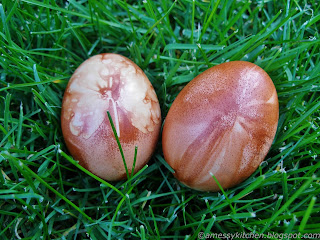
I was happy to be able to try out the onion skin method as well this year. (I saved my dry onion skins for months!) Since I was already turning my skins into orange dye, I took the opportunity to simmer some eggs in it at the same time. I put some leaves on the eggs and twisted them up in stockings and got some really cool marbling and outlines.
(These onion skin eggs were done using light brown farm eggs.) I think I could have gotten better definition of the leaf patterns if I had tied the stockings tighter with a rubber band. But I'm still happy with them especially since it was a last second thing.
So here is what I used for my dyes and how I made the eggs.
Red/Pink: Beets
Orange: Yellow Onion skins
Yellow: Turmeric
Green: Red Cabbage + Turmeric
Blue: Red Cabbage
Violet: Red Cabbage + Beets
To make the dyes, use 4 cups of chopped or grated (beets, cabbage, onion skins) with one quart of water and 2 tablespoons of vinegar. Turmeric is 3 tbsp powdered spice per quart. Bring to a boil, then cover and keep at a hard simmer for 30 minutes. Strain the dye into a bowl and mix in 1 tablespoon of salt. Let cool until not steaming, then soak your hard boiled eggs for 30 minutes in the dye. For all colors except red, rinse and set on a napkin to dry. The colors will intensify somewhat when dry. I forgot about that. I could have taken the orange eggs out at 30 but I gave them another 10-15 minutes. They turned out pretty intensely orange. For the red dye, take out the egg on a spoon and set on a napkin to dry. DO NOT RINSE. I gave my beet dyed eggs an hour because I didn't have enough beets. And I re-dipped them a few times. Last time my beet dyed eggs turned out a vivid dark fuschia. This time they were more red.
For green I first used a cup of yellow dye and a cup of blue dye. I decided at 30 minutes that the green was a little yellow and stuck one egg back into some blue for a few minutes. The egg in back is the yellower one and the front one had the extra blue time. So maybe 2/3 cup yellow and 1 1/3 cup blue would be better.
For the violet I eyeballed about half blue and half red dye for 30 minutes.
So that is my refined this year's results for natural egg dyes. Enjoy your Easter!
(I did really like the more navy blue color I got from blueberries last time as well!)
(I did really like the more navy blue color I got from blueberries last time as well!)


I've been doing various natural dyes for years now, but I had an idea/quesetion. I was wondering, since I make a TON of dye, and dye over 6 dozen eggs, if it wouldn't be advantageous to try freezing them for next year (I'm Eastern Orthodox, so Easter is tomorrow for us). Do you think they would work as well in a year (2, 3, 4 years) time?
ReplyDeleteThat's an interesting question. I can't answer it without a doubt, but I do know that my purchased natural food dyes last better under refrigeration. The thought of freezing did run through my mind as well but I didn't do it. Natural dyes are much more fragile and susceptible to oxidation. There is the vinegar and salt for preservative though... I would say it is worth a try but I would not expect keeping quality to last beyond a year. And I would definitely try it out a week in advance to see how they are doing or whether I would need to whip up some more fresh dye. If you do freeze, make sure to get all the air out to avoid discoloration. Good luck if you do try it!
ReplyDelete