Our December Bread Bakers challenge of Bread Art, hosted by Passion Kneaded, gave me the perfect excuse to try out a recipe I've been wanting to tackle for a few years now! It's more of a pastry type bread, but there's yeast and it's definitely art.
Shekerbura is an Azerbaijani dessert. It consists of a pastry dough filled with ground almonds, hazelnuts, or walnuts, and sugar. The pastry dough is made of wheat flour, butter, milk, egg yolks, cream/sour cream and yeast, although it can also be a short pastry with no yeast. (The yeast adds a little tenderness to the pastry.) The filling often includes cardamom, which is a total winner for me as it is one of my favorite spices.

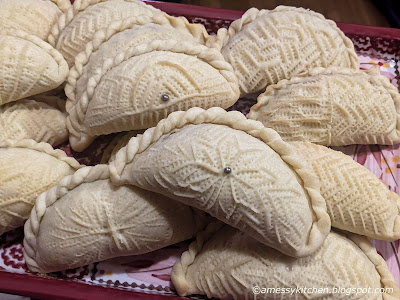
Shekerbura typically have an intricate pattern imprinted on the dough before baking. This is usually produced using traditional tweezers/crimpers called maggash. When I looked recently they were difficult to obtain outside of Azerbaijan, which is sad because I found them on eBay quite a few years ago for just a few bucks. I did pick one up at the time, knowing I wanted to make the pastry at some point. Now they do say that if you do not have a maggash, just to leave the pastry dough plain after folding the edges, but the patterns are just so beautiful!

Interestingly, I found that many cultures have a similar cookie and decoration with tweezers. The maamoul of the middle east are filled with nuts or dates and crimped with a serrated tweezer, as are the kuih makmur and kuih bangkit of Malaysia and Singapore. And I know there are others.
The filling is dangerous. Try not to get into it too much. I love cardamom... While shekerbura have traditional patterns, they may be decorated as
ornately as desired. I read somewhere that there is almost an unspoken competition in bringing out a
tray of beautifully and ornately decorated shekerbura for guests. I have seen extra bits of pastry shapes and bows, and silver nonpareils/dragees added as embellishments. Check out Pinterest boards for some seriously gorgeous shekerbura!

(These freeze and reheat wonderfully in a low toaster oven!)
Shekerbura
Makes ~24 shekerbura pastries
For the Dough:
500g all purpose flour + ½ tbsp (for step 3)
200 g / 7 oz unsalted butter, cut into large chunks
2½ egg yolks
125 g / 4.5 oz sour cream
1/8 teaspoon salt
¼ tsp dry yeast
½ tbsp sugar
¼ cup / 63 ml lukewarm milk, divided
For the Filling:
350 g / ¾ lb skinned hazelnuts, or almonds or walnuts (I used half hazelnuts, half walnuts)
350 g / ¾ lb granulated sugar (I used 250g white sugar, 100g light brown muscovado sugar for flavor)
1 tsp ground cardamom (freshly ground will have more flavor than pre-powdered)
1-2 tsp Frangelico (optional)
Equipment: mixing bowls or mixer, baking sheets, and a maggash (decorating tweezers)
To prepare the dough:
Put the flour and the butter in a large bowl or mixer. Using your hands, rub them together until you obtain fine crumbs, or run the mixer on low to achieve the same consistency. Make sure that the butter is fully incorporated and that there are no large crumbs left.
In a small bowl,whisk together the eggs yolks, sour cream, and salt.
In a small dish, mix together the yeast, ½ tbsp flour, ½ tbsp sugar. Fill it with 2 tbsp of lukewarm milk, mix, and let stand for about 2 minutes.
Add the egg and the yeast mixtures to the flour-butter mixture.
Using your hands, or the paddle attachment, mix the ingredients until fully incorporated and a rough and inconsistent dough is obtained. Transfer the dough to a work surface. Put the remaining 2 tbsp of lukewarm milk in a separate dish. Constantly wetting your hands with milk, knead the dough for a few minutes to make it smooth. You may also work the milk in with the mixer, just until combined, then give a few turns on the counter.
Shape the dough into a ball. Place it back in the bowl and cover with plastic wrap. Set aside to rest for about 30 minutes.
While the dough rests, prepare the filling. If you are using already skinned nuts, grind them finely in a food processor. In a mixing bowl, combine the ground nuts with the sugar(s). Add the ground cardamom and Frangelico, if using. Mix until fully incorporated.
To skin hazelnuts at home you can either roast and rub the skins off, or blanch, ice bath and rub, and then toast. This post covers both methods.
Divide the dough into balls, each weighing 40-50 g. (I originally used 50 gram balls and cut them with a 4-inch round cutter, saving the scraps for new balls.) Work with one ball at a time and cover the rest.
Roll each ball into a 4 inch (10 cm) circle.
Place the circle in the palm of your hand, slightly folded, and put 2 rounded tablespoons of the filling in the center. Pat down to compact just a little.
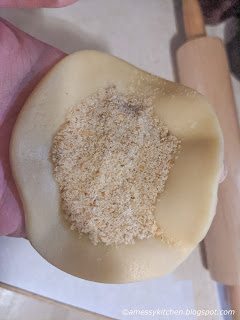
Starting at one end, begin sealing the left and right edges towards the center to obtain a half-moon shape. Sealed shekerbura must have enough filling to be somewhat plump and never flat.

Using your thumb and index finger, start pinching and twisting the dough along the seal to decorate the edges.


Arrange the pastry on a baking sheet, lined with parchment (baking) paper. Continue working with the rest of the dough balls, arranging them on the baking sheet as you are finished decorating their edges.
 |
| First attempts were so bad, I had to use a pasty press to fix the crimp. Got the hang of it eventually! |
Now decorate the tops. Holding a pastry in one hand, and a maggash (tweezers) in the other, pinch the dough with the maggash at an angle and slightly lift it upward. Continue until you obtain a row of pattern. Create similar rows, each at an angle to the next one, until the entire surface is decorated.
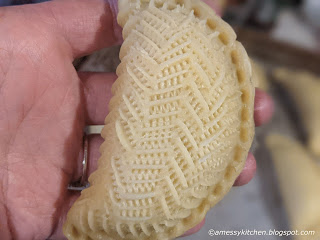 |
| This is the traditional herringbone pattern for shekerbura. |
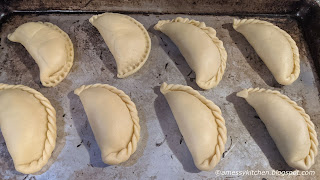
If maggash is not available, leave the top of shekerbura plain, without any patterns.
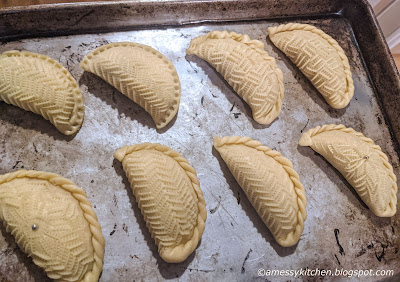 |
| This is how shekerbura pastries look before they go in the oven. |
Bake on the middle rack of the oven preheated to 175ºC (350ºF) for 15-20 minutes, or until the edges just begin to change their color and the bottom is light brown. Take care not to overbake the pastries – the tops should be light in color when baked. If you did not decorate your pastries with the tweezers, dust them with powdered sugar after they have cooled off.

- A Christmas Partridge for my True Love from A Day in the Life on the Farm
- Christmas Wreath Focaccia from Karen's Kitchen Stories
- Mini Fougasse from Ambrosia
- Roasted Garlic Focaccia Wheel from Magical Ingredients
- Rudolph Reindeer Sourdough Bread from Zesty South Indian Kitchen
- Santa Bread from Passion Kneaded
- Shekerbura from A Messy Kitchen
- Sunflower Bread from Making Miracles
- Wool Roll Bread With Cranberries from Sneha's Recipe
We take turns hosting each month and choosing the theme/ingredient.
.png)
Oh my word!!!! I am so impressed. They turned out amazingly beautiful. You have much more patience than I. I was all stressed out that it took me longer than a couple of minutes to place my almonds onto my partridges wings LOL.
ReplyDeleteThe closer it gets to Christmas, the less patience I have! (And the more items get crossed off the "to make" list due to lack of time or just desire to reduce stress.) I do love holiday baking though.
DeleteOh my gawd!!! How long did that take? You are a rock star! These would put decorated cookies to shame!
ReplyDeleteLol, just an evening, though I am glad I reduced the recipe by half!!
DeleteYou made beautiful Shekerbura perfect treat.
ReplyDeleteThank you! I've been looking forward to making these for years now.
DeleteWowsa! Those are stunningly beautiful! I even have a set of those fondant crimpers - but do I have the energy to learn how to use them?
ReplyDeleteStill, shekerbura do look like an awfully good reason to learn!
Well there are lots of videos on youtube showing the folding and pinching, most with the traditional herringbone pattern, but you can find others. I got a lot of inspiration from Pinterest photos. I got that maggash in 2017, so I've had time to decide on recipes and decorations. Still did a few just out of my own imagination. Half batch still makes more than 2 dozen, so for you I might recommend even smaller batch! Mine are in the freezer to take for Christmas, but we did get into quite a few of them...
Delete(In the very last picture, the bottom left and bottom center were just me fiddling around with patterns. I really like the bottom left! Looks like a little clutch or shell.)
DeleteThat's so beautifully designed, you are so patient in doing such intricate work.
ReplyDeleteI think doing a half batch was definitely the way to go! Enough to have fun but not get sore fingers. I was pretty pleased with one of my original designs in particular. I may need to try one of the heart shaped shekurbura I have seen recently...
DeleteHello Kelly, the Shekerbura are a beauty. What lovely pattern. The filling is to die for. In India, we prepare similar pastry with sweet filling. It had dried milk, raisins, desiccated coconut, a lot of nuts and cardamom. Its called Gujia and it is fried.
ReplyDeleteIt sounds divine!
DeleteI am awe struck with these. I have those crimpers … I saw cookies I want to do with them. Yours or so detailed I think I’m intimidated to try. Gorgeous!
ReplyDeleteIt wasn't drudgerous, just repetitive, but that doesn't necessarily make it a bad thing. It was fun making the designs!
DeleteThis is a show stopper!!! I would have given up after the first row.
ReplyDeleteThis is stunning! Love it! I have seen this but never pulled myself to make. Now you have convinced me to make it. Bookmarking to try soon!
ReplyDelete