
I've made the recipe four times in various versions to see what worked best. I can recommend the KA yeast version as absolutely delicious IF you use a good bread flour! My first was a fail with all purpose. Trying to add more flour after deciding there was no saving the structure of the gluten just results in a poor bread crumb with no flavor. Don't be scared though, we got reports of success from other Babes during the time we had for baking! And it's okay to reduce the hydration (water) a little bit to get a bit more workable dough with still that nice open and chewy crumb. It's almost as much a function of time and handling as it is hydration. Let's compare:
 |
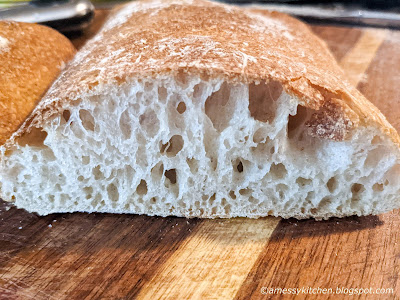
| 100% hydration (yeast version) |
 |
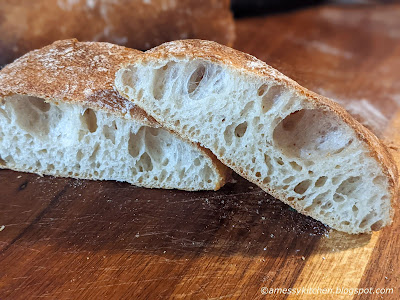
| 73% hydration (sourdough version with some whole grain) |
 |
| 83% hydration (sourdough version)* |
This recipe may be halved. We really devoured this bread, it is absolutely delicious with butter. The lower hydration options were beyond amazing with soup. Will you be brave and try it out? We would love to see your variations this month and share how it turned
out! New recipes are posted every month on the 16th. Check out our Facebook group to see the participants' baking results during that time. If you would like to post your results with a Buddy badge on a blog, let me know in the comments or on the Facebook page.
Pan de Cristal (Glass Bread)
recipe from King Arthur Flour
makes 4 small breads
500g water (If the hydration scares you, try it with 450g the first time)
500g King Arthur Unbleached Bread Flour
2.5g (3/4 teaspoon) instant yeast
10g salt
15g olive oil, for the pan
In a medium bowl, mix the water, flour, yeast, and salt until thoroughly combined and evenly hydrated. The dough will start off quite slack and wet. The structure will transform itself with time and folds.
Oil a two-quart rectangular or square baking dish (10” x 7”, or 9" square) with the olive oil. (This dish is just for working the dough, not for baking.) Pour the dough into the oiled pan.
Check the dough’s temperature with a digital thermometer inserted into the center. If it is less than 72°F, move the pan to a warmer spot. A cold oven with just the light turned on is an effective spot, or above the refrigerator.
Cover the pan and allow dough to rest for 20 minutes.
Start with an initial bowl fold: Wet your wet hands and scoop under to grab a section of dough from one side, lift it up, then press it down into the middle. Repeat this eight to 12 times all around the edges.
Cover the dish and allow the dough to rest for 20 minutes.
Then do a coil fold: Wet hands again and reach under the dough, stretching the middle upward until the dough releases from the dish. Roll it forward off your hands, allowing it to fold over (or “coil”) on itself. This is called a coil fold. Depending on the strength of your flour, this may need to be done in smaller sections initially. Rotate the dish 90 degrees (a quarter turn) and repeat. Continue performing this folding action until the dough feels like it won’t stretch and elongate easily, usually four to five times initially. This technique will be repeated three more times, each time building strength and developing the dough.
Cover the pan and allow the dough to rest for 20 minutes.
Repeat the coil fold as previously described. Cover and allow the dough to rest for 20 minutes.
By this point, the dough should be easier to handle and feel tighter. Repeat the coil fold using only two or three folds this time. Cover and allow to rest for 20 minutes.
Repeat the coil fold one last time, using only one or two folds if the dough is relatively strong. Cover the bowl and allow the dough to rest for about 80 minutes before shaping. (If the dough does not feel fairly springy at this stage, another series or two of coil folds with rests may be necessary.)
As gently as possible, turn/flip the dough out onto a heavily floured surface, maintaining the rectangle or square shape. Take care not to deflate the delicate dough. Sprinkle a good amount of flour on top of the dough, leaving no exposed sticky spots. Working as gently as possible, use a bench knife or other sharp knife to divide the dough into four pieces. Gently maneuver two pieces onto a piece of parchment, leaving space between them. Do the same with the remaining two pieces of dough, placing them onto another piece of parchment.
Let the loaves rest at room temperature for 2 hours, uncovered. Meanwhile, preheat the oven to 475°F with a baking stone or steel on a lower rack. Give the oven an hour to heat up fully. The loaves will be ready for the oven when there are a few large bubbles on the surface of each, and they feel light and airy.
Once ready to bake, carefully slide the two loaves (with their parchment) into the oven onto the preheated stone or steel. Cut the parchment if necessary to fit on the baking space. Let the other two loaves to continue to rest while the first are baking.
Bake the loaves for 15 minutes, then transfer them, from the stone or steel, directly onto a rack in the upper third of the oven for an additional 13 to 15 minutes. (Leave the stone in place.) Moving them to the rack allows the baking stone or steel to become hot again in preparation for the next two loaves. After a total of 27 to 30 minutes of baking, remove the loaves from the oven and allow them to cool on a rack. (You can alternately bake the loaves fully on the stone and allow at least 15 minutes for it to reheat before baking the next batch.)
Repeat the process with the two remaining loaves. Cool the bread fully before slicing.
Bread is best on the first day but may be wrapped loosely and stored at room temperature for up to several days; freeze for longer storage. Refresh in a hot oven for a few minutes.
Sourdough version (Plan ahead - two day recipe)
makes 2 loaves
440g bread flour (all purpose works but should add another coil foil or two)
365g water (you can push this up to 396g if using bread flour for a 90% hydration dough)
100g active sourdough starter
10g sea salt
8am
– For the starter; combine 20g fed sourdough starter, 40g flour, and
40g water. Starter should be used right at its peak, after about 4½ to 5
hours.
9:30am – Combine flour and water in a bowl. Mix well and let rest for about 3 hours, until starter is ready.
12:30pm
– Wet your hand, add starter to the dough. Mix by hand, scooping up
and over the edges until incorporated, about 5 mins. Cover and rest for
30 mins.
1:00pm – Add salt and mix with a wet hand until fully incorporated, about 5 minutes. Cover and rest for 1 hour.
2:00pm
– Mist your work surface with water and wet your hands. Transfer dough
onto the surface and gently pull from the center out to form a rectangle
shape. Scoop up one edge and fold into the center. Pick up other edge
and fold into the center over first section. Fold the top down half way.
Fold the bottom up. Put dough in a large dish. Cover and rest for 45
mins.
2:45pm – First Coil
Fold*. Lift the dough from the middle with both hands. The four fingers
will be on the underside, below the dough and only the thumbs are above
the dough. Lift the dough and place it on the dish like a coil. Do this
once from each side. Cover and rest for 45 mins.
3:30pm – Second Coil Fold. Repeat the same. Cover and rest for 45 mins.
4:15pm – Third Coil Fold. Repeat the same. Cover and rest for 45 mins.
(If using all purpose flour, you may want to do a couple more folds to increase structure. Try 5 folds every 30 minutes.)
5:00pm
– Transfer dough to a lightly oiled square pan if not already using one. Cover and move to the refrigerator for 12
- 16 hours.
The rest of the Bread Baking Babes
- Blog from OUR Kitchen – Elizabeth
- Judy’s Gross Eats – Judy
- My Diverse Kitchen - Aparna
- Bread Experience - Cathy
- Thyme for Cooking - Katie
- My Kitchen in Half Cups - Tanna
- Feeding My Enthusiasms - Elle
- Karen's Kitchen Stories - Karen

Loved this bread! Interesting to see all your variations. Thanks for selecting this!
ReplyDeleteI too am very happy with how this turned out, although I didn't try the sourdough version! you got excellent holes on both of those too!
ReplyDeleteI cannot get over the oven spring and giant holes on your bread. How cool that your sourdough version worked as well! (The turmeric certainly turns is gold, doesn't it?!)
ReplyDeleteThank you for this thrilling stretch, Kelly!
Stretch? Are you punning in my comment section? 😄😄😄
DeleteHeeheeeheee. That's why I didn't add "no pun intended". (I couldn't figure out a way to slip in "coil" or "fold" though....)
DeleteWOW! I am now given courage to try some with whole wheat.
ReplyDeleteEveryone of your bakes has beautiful holes and beautiful crust! Stretch or coil or fold I that this was a total overcoming of the crock. I rather envision a redo of the crock with the coil technique, would you think that would change anything. Maybe it’s more in the flour.
Well, every one that I was willing to post! LOL. I did have a couple fails. But the whole grain worked. I think it was 80g whole grain to 245g bread flour, and then the starter as well.
DeleteI added a little bit of whole wheat flour AND wheat germ to mine. Granted, I didn't have the spectacular success that everyone else had, but it didn't seem to wreck things entirely.
DeleteFor 400 grams flour, I used 20 grams whole wheat flour, 368 grams all purpose, 4 grams vital wheat gluten, and 8 grams wheat germ.
If I had had the courage to use our wild yeast, it would have amounted to more whole wheat flour (our starter is 100% whole wheat).
To add more whole wheat flour than the piddling amount I added, my guess is that if you autolyse the flour overnight, rather than just for 2 hours before adding the yeast, everything would work well. What do you think?
I would say personally, to use a greater portion of whole wheat, I would definitely start with the 75-83% hydration, and wouldn't ever go over 90%. I'd start lower first and go up each time I made it until it didn't work anymore.
DeleteI remember the croc....
ReplyDeleteThis looks much better ;-)
Now that I have picked up some actual King Arthur bread flour, I am almost tempted to look at the croc. Almost...
DeleteI must say a big thank you to for picking this bread. It got me over some of my fear of high hydration dough.
ReplyDeleteLove your turmeric version, especially.
Thanks for the fun bake Kelly! Love the idea of adding turmeric.
ReplyDelete