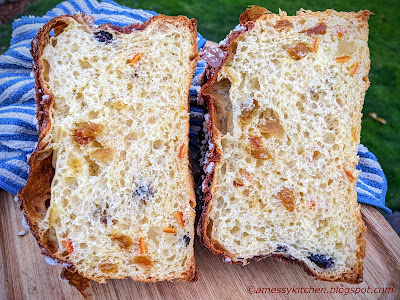
At last, an excuse to make something that has been on my to-make list for quite some time! This month our Bread Baking Babes have made Panettone. This Italian sweet bread is a production to make authentically, taking several days to build and proof. I have never tried the purchased versions I have seen in the shops in cardboard boxes and now having made one, I am curious if I would be disappointed by the commercial version. Probably. This bread (let's be honest, this is a cake, just a yeasted one), is totally amazing. Looking at pictures, I figured it would probably be dry, but after choosing to go the longer route of making a "sweet" stiff starter, this bread turned out anything but dry! You can see from the picture that I didn't let it cool completely and so it slumped just a little, but oh my wow. Seriously, it tasted like a fruited sponge cake. Totally moist and quite decadent. (Actually, turning any stale leftovers into french toast is like making instant bread pudding in a fry pan. Amazing.)
 |
| Let it cool completely so the structure doesn't collapse! |
 |
| Completely cooled before slicing. Nice and tall. |
I did go for a different recipe than the shorter King Arthur based version that our host kitchen presented. My only problem was not measuring my molds and finding out only at the end of proofing that I had divided the dough for the smaller molds I ordered and not the larger ones they actually sent me. I caught the mistake in time to prevent overproofing, but ended up with shorter loaves instead of the crowning dome and mushroom top of the traditional loaf that would have presented had I made only two instead of three. Oh darn. Guess I will have to make more... Might try the KA version, but I did so love how Alumni Babe Susan's turned out that I don't know if I could ever make a different one. Be warned, there is no skipping steps or speeding things up with the method I chose. It is chock full of butter, sugar, and liquid. But with the correct application of extensive mixing and gluten development, I was blown away at how a batter-like, super enriched dough could still hold structure. Here are Susan's notes on the matter:
Mixing
- Panettone requires a very disciplined mixing technique. If you’re not willing to be patient with the mixing, don’t bother.
- Butter and sugar require strong gluten to support them. However, those thankless little ingredients also do everything they can to impede the development of that gluten, as does water. Therefore, these three things are mixed into the dough in a specific and controlled way.
- Initially, the dough is mixed using only a fraction of the water, and none of the sugar and butter. Then the sugar is added slowly, in several increments, and the dough is further mixed until the gluten is fully developed. Only then is the butter incorporated, and only after that is the remaining water added.
- This takes at least 30 minutes and on occasion has approached an hour.
- When the dough is properly mixed and the gluten fully developed, you should be able to stretch it into a very thin, very smooth, translucent “windowpane.”
- I am not kidding. Really. Seriously. Trying to hurry it along will only backfire and you’ll be mixing for three or four times as long. Don’t ask me how I know this.
Then of course after the bulk proof, it looks rather unappetizing in its loose pile of dough and fruit. But then it perks up nicely with some judicious tucking/folding.
One other difference in the recipes is the use of a "glaze" in the Wild Yeast version. It's amazing, crispy crunchy, even though I got Belgian instead of Swedish pearl sugar and had to break it up with my mortar and pestle. I might use just a pinch of cocoa powder as my glaze seemed darker than Susan's, and I recommend a ½-1 tsp addition of water to make it easier to brush on the tops of the loaves. But I would also try the quarter snip on the top of a loaf with a pat of butter tucked in next time as an alternate option. I personally would forgo the blanched almonds on top as they are just hard to find. I did add a few slivered almonds to one loaf instead.
Any way you slice it, Panettone is delicious. I did make my own candied peel, being very disappointed in any purchased versions I have tried. It's pretty easy and quite delicious, not to mention that you end up with a lovely citrus infused simple syrup!
Below is the easier King Arthur version that I think most of our bakers used, the version I made can be found here.
Panettone
makes 1 loaf
(Bake in 2 quart sauce pan)
Starter
¾ cup (90g) King Arthur Unbleached All-Purpose Flour
1/16 teaspoon (just a pinch) instant yeast
1⁄3 cup (74g) cool water
Dough
all of the starter (above)
2¼ cups (270g) King Arthur Unbleached All-Purpose Flour
¼ cup (57g) lukewarm water
2 large eggs
4 tbsp (57g) butter, softened
½ tsp Fiori di Sicilia flavoring OR 1 tsp vanilla + 1⁄8 tsp orange oil
2¼ tsp SAF Gold instant yeast or 1 tbsp instant yeast
1¼ tsp (8g) salt
1⁄3 cup (67g) granulated sugar
½ cup (85g) golden raisins
½ cup (64g) slivered dried apricots
½ cup (85g) dried cranberries
½ cup (71g) chopped dried pineapple
2 tbsp (28g) orange zest (grated rind) or lemon zest (grated rind)
Instructions
1. To make the starter: Combine starter ingredients in a medium-sized mixing bowl, cover and allow to rest overnight (8-12 hours).
2. To make the dough: Combine all of the dough ingredients except the fruit and zest. Mix and knead them together by hand, mixer or bread machine until you've achieved a soft, smooth dough.
3. Allow the dough to rise, covered, for 1 to 1½ hours, or until the dough is puffy but not necessarily doubled in bulk.
4. Gently deflate the dough and knead in the fruits and zest. (Soak fruits in hot/boiling water to soften. Drain before adding them)
5. Shape the dough into a ball and place it in a panettone pan or other straight-sided, tall 1½-2-Qt pan. Cover the pan and let the dough rise until it's just crested over the rim of the pan, about 1 hour. (It is helpful to line the pan with parchment paper.)
6. Bake the bread in a preheated 400°F oven for 10 minutes; reduce the oven heat to 375°F and bake an additional 10 minutes; then reduce the heat to 350°F and bake for 25 to 35 minutes, tenting with aluminum foil if the crust appears to be browning too quickly. Panettone should be a deep brown when done, should sound hollow when tapped, and will read 190°F at the center using a digital thermometer.
7. Remove the panettone from the oven and cool completely. Store at room temperature, well-wrapped, for up to a week; freeze for longer storage.
The rest of the Bread Baking Babes
- Blog from OUR Kitchen – Elizabeth
- Judy’s Gross Eats – Judy
- My Diverse Kitchen - Aparna
- Bread Experience - Cathy
- Thyme for Cooking - Katie
- My Kitchen in Half Cups - Tanna
- Feeding My Enthusiasms - Elle
- Karen's Kitchen Stories - Karen


Wow!!!! Look at that crumb! I am not worthy.
ReplyDeleteSusan's recipe is intimidating for sure! But I was amazed at how easy this was to work with when making sure to develop it as she stated. I just used the roller kneading attachment on my ankarsrum, not even a dough hook.
DeleteYour crumb does look fabulous! And great idea to use Susan's method.
ReplyDeleteI've always had great results from her recipes. Her overnight ciabatta is to die for!
DeleteIt's gorgeous! Bravissima!
ReplyDeleteExcuse me for replying to myself.... I have tried commercial panettones. Friends have given them to us. The ones we tried were horrible. They were insanely sweet and reeked of way too much vanilla and orange extract. (Or it might have been lemon extract. Whatever it was, it was very artificial and unpleasant - a bit as if whoever made the cake had added a couple of teaspoons of lemon pledge to the dough.)
ReplyDeleteEwwwww. It might be the citron, it's very strong I understand. My mom can't stand it. This is fairly sweet, but not cloying. Definitely cake-like. I imagine the sugar could be cut just a bit but it was so wonderful as it was.
DeleteYour 'formless blob' shaped up very nicely.... Looks lovely. I wouldn't bother trying the commercial versions lol
ReplyDelete