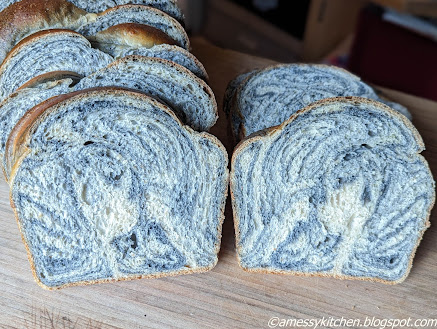
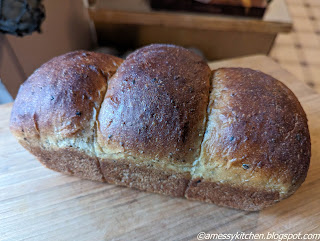
It's my month to host for the first BBB bake of the year and I decided to delve into a method we haven't tried yet as a group bake. While we have baked with tangzhong based dough before we hadn't tried the yudane method. The principle and the results are quite similar, but the proportions and method differ. Both are meant to introduce a larger amount of moisture into the dough than would otherwise be there, by cooking/heating a portion of the flour with water to gelatinize some of the starches. I believe tangzhong is usually around 7% of the dough and a 1:4 flour to water mixture, whereas yudane is more like 20% of the dough and usually just about a 1:1 mixture, though the proportions vary by recipe. Yudane also has to rest longer, though I find many recipes prefer to make both of them the day before.
So our bake is a marbled black sesame shokupan, or Japanese milk bread, made with the yudane method, with an alternate un-swirled option for a slightly easier shape. I know sesame can have a strong flavor for some folks, though I consider the flavor pretty light in this bread. It's quite subtle on the crushed loaf for which I have used half crushed toasted black sesame and half chia seeds. Just a really nice, soft, multigrain loaf.
*For the option with less shaping required, simply add 2 tbsp lightly crushed toasted black sesame seeds to the total dough and forgo the marbling step. If you truly don't like sesame, consider adding in 1-2 tbsp of chia seeds in the simple shaped loaf for a similar look. Consider dividing the dough into two or three smaller balls in the loaf pan for a more fancy look if skipping the marbling step.
Black Sesame Shokupan (yudane method)
Yields: 1 loaf
Yudane:
75g bread flour
68g boiling water
Bread dough:
210g bread flour
90g spelt flour (or kamut, or whole wheat) I used freshly ground kamut this time
1¾ tsp active dry yeast
2 tbsp + ¾ tsp brown sugar
1⅛ tsp salt
2 tbsp flaxseed, ground in food processor or spice grinder
15g butter
225g whole or 2% milk, cold (reserve 30g, about 2 tbsp, and add in 1 tbsp at a time to final dough if dry)
Black sesame paste:
2 tbsp (14g) toasted black sesame seeds
1 tbsp (12g) granulated sugar
1 tbsp (14g) unsalted butter
Topping:
egg wash (1 small egg + ½ tbsp water, beaten together)
Yudane (The day before):
In a bowl, combine 75g bread flour in a bowl and boiling water and mix well with spatula or spoon. Cover tightly and place in the fridge for at least 4 hours or overnight. The mixture will be stiff after mixing, and soft and pliable the next morning. Use directly from the fridge.
 |
| Yudane - quite different to a tangzhong. |
The next day (or at least four hours after making the yudane):
Finely grind the black sesame seeds in a small food processor. Add the sugar and softened butter. Pulse to make a paste. Transfer to a small bowl, cover, and set aside. (This step may be skipped for the more plain loaf option.)
Tear the yudane dough into pieces and combine with the flours, yeast, brown sugar, salt, flax seed, and milk in the bowl of a stand mixer. Stir together with a spatula or paddle attachment for 2 minutes to incorporate. Change to the dough hook and knead for another 3 minutes or until the dough comes together. Add the butter and continue kneading for another 10 - 13 minutes or until the gluten is well developed and can be drawn out into a fairly transparent sheet (windowpane test). This dough should be slightly tacky but not sticky. Scrape down the dough from the hook periodically during the kneading process to ensure well distributed gluten development.*
Using a scale and a bench knife, separate the dough into 1/3 and 2/3 portions. Place the smaller 1/3 portion of dough back in the mixer, add the sesame paste, and knead until combined. About 3-4 more minutes.
Place the plain and sesame dough each in their own bowl. Cover and let rise in a warm place for 1-2 hours or until double in size.
When the doughs have doubled, turn them out onto a lightly floured surface. Using a rolling pin, roll out the plain dough into an 8x12-in (20x30-cm) rectangle. Roll out the sesame dough into an 8x6-in (20×15-cm) rectangle. Place the sesame dough on top of one side of the plain dough and fold the plain dough over to enclose the sesame dough.
Using a bench scraper, pizza cutter, or knife, cut the dough in half width-wise, then stack the two pieces on top of each other. Roll the dough back into an 8 x 12 in (20 x 30 cm) rectangle. Repeat this step twice more, having finally cut and stacked a total of three times.
Now, using the bench scraper, pizza cutter, or knife, slice the dough lengthwise into 3 equal 12-inch strips. Roll and twist each strip into a tube/rope shape and braid the ropes together.
Grease an 8½x4½-in loaf pan. Fold the ends of the braided dough under to fit in the bread pan. Proof in a warm place for 45 min to 1 hour or until doubled in size.
While the loaf is rising, preheat oven to 350°F (175°C). When the loaf has doubled, brush with egg wash. Bake for 30 minutes until golden and baked through, (internal temperature should be at least 190ºF). Cool in the pan for about 5-10 minutes. Remove the loaf from the pan and finish cooling on a wire rack completely before slicing and serving.
The rest of the Bread Baking Babes
- Blog from OUR Kitchen – Elizabeth
- Judy’s Gross Eats – Judy
- My Diverse Kitchen - Aparna
- Bread Experience - Cathy
- Thyme for Cooking - Katie
- My Kitchen in Half Cups - Tanna
- Feeding My Enthusiasms - Elle
- Karen's Kitchen Stories - Karen


Thanks for the challenge, Kelly! After I got over my fear of the black sesame seed paste, things went fairly well. Both of your loaves look lovely!
ReplyDeleteSo glad you were satisfied with your results! I think your loaves are beautiful and I think, like you, I will be trying the yudane elsewhere. It will be a challenge for me to discover proper hydration with converting to this method!
DeleteYour marbling is beautiful! Thanks for getting me to try yudane! It works great!
ReplyDeleteI'm so glad you tried it out, I love everything about your loaf, beautiful crumb texture and color on the crust!
DeleteA wonder of an anniversary bread. Great job Kelly.
ReplyDeleteThanks Tanna! What is it, 16 years now? Wow!
DeleteYour bread looks so stunningly beautiful! And lofty. Exactly what I was going for. If only I had read (and retained) the instructions!
ReplyDeleteHappy 16th anniversary!
Instructions are overrated? Yes, no? :D
DeleteSuch a fascinating bread! Yours looks so beautiful and well baked Kelly!
ReplyDeleteThanks! I loved seeing all the versions baked up.
DeleteWhat a gorgeous loaf of bread! I am amazed, impressed, and intimidated.
ReplyDeleteI would say no more difficult than a poolish! Just a new and cool method to try out!
DeleteI love this loaf, I'll be a buddy this month. Yes I know it's been a long time. I just have to write my blogpost, hope I still know how after all these years! Thanks for the lovely recipe.
ReplyDeleteOh hooray! So good to see you again!
Delete